
WHAT IS EDITING AND FORMATTING TEXT.
In this section we will study how to add, delete, insert, copy, paste, drag and drop text in a document and then how to design a creative and effective document using the formatting features of Word.
Text Basics
In this section we will learn how to insert, select, delete, copy, paste, drag and drop text.
To Insert Text
Move the mouse to the location where you wish the text to appear in the document and left click the mouse there.
OR
Use the arrow buttons on the keyboard to reach the location where the text should appear.
The insertion point (blinking cursor) appears. Start typing the text at the insertion point. You may also use the following keyboard shortcuts or Tab or Enter keys to move through the document:
Home: To reach the beginning of the line
End: To reach end of the line
Ctrl+Home: To reach beginning of the document
Ctrl+End: To reach end of the document
To Delete Text
Place your cursor next to the text you wish to delete.
Press the Backspace key on the keyboard to delete the text on the left of the cursor.
Press the Delete key to delete the text on the right of the cursor.
To Select Text
Place your cursor next to the text you wish to select.
Left-click your mouse and while holding it down, drag you mouse over the text to select it. Release the mouse button. The selected text gets highlighted.
OR
Press the Shift key on the keyboard and use arrow keys to highlight the text.
Options --> Popular. Mini Toolbar makes formatting commands easily accessible.
Shortcuts for selecting a portion of the text are:
To select Whole Word: double-click within the word OR use Shift+Ctrl+arrow(right or left) keys on the keyboard.
To select Whole Paragraph:triple-click within the paragraph OR use Shift+Ctrl+arrow(up or down) keys on the keyboard.
To select Entire Document: Use Editing à Select à Select All from the Home Tab OR
press Ctrl+A
To Cut, Copy and Paste Text
Select the text you wish to cut or copy.
Click the Copy command on the Home Tab OR use the keyboard shortcut CTRL+C to copy the text.
OR
Click Cut command on the Home Tab OR use the keyboard shortcut CTRL+X to cut the text.
Set the cursor where you wish to paste the text
Click the Paste command on the Home Tab OR the keyboard shortcut CTRL+V. The text will appear at the cursor position. In case of copy, there will be a duplicate copy of the selected text. In case of cut, the selected text will be moved from its original place to the new cursor position.
To Drag and Drop Text
Select the text you wish to copy.
Left-click your mouse and while pressing the mouse button, drag the text to the location where you wish it to appear. The cursor will have a text box under it to indicate that you are moving text.
Release the mouse button and the text will appear at the desired position.
Formatting Text
In this section you will learn how to manage the font, font size, colour, indentation, justification, paragraphs, styles, etc to create an effective document.

To understand how to use text formatting features we will work towards writing following text:

Open a new document and type the following text:
Invitation for 36th Annual Concert
Use Enter key for Newline: To get the text in two lines as above
Set the cursor right before 36 and press Enter key from the keyboard. You will get the text as Invitation for 36th Annual Concert.
Change the Font: to change the font of the above text:
Select the text 36th Annual Concert.
Click on the drop down arrow next to the font style box in the Font Group of the Home Tab. A drop down menu appears.
Move the cursor over various font styles. A live preview of the font will appear for the selected text.
Choose the font called Baskerville Old Face from the menu. Font style will change for the selected text.
Now select Invitation for and set the font to Bodoni MT for this text.
Change the Font Size:
Select the text 36th Annual Concert.
Click on the drop down arrow next to the font size box in the Font Group of the Home Tab. A drop down menu appears.Choose the font
called Baskerville Old Face from the menu. Font style will change for the selected text.
Now select Invitation for and set the font to Bodoni MT for this text.
Change the Font Size:
Select the text 36th Annual Concert.
Click on the drop down arrow next to the font size box in the Font Group of the Home Tab. A drop down menu appears.
Move the cursor over various font sizes. A live preview of the font size will appear for the selected text.
Choose the 28 as the font size. Font size will change for the selected text. Now select Invitation for and set the font size to 18 for this text.
Change the Font Colour:
Select the text 36th Annual Concert.
Click on the drop down arrow next to the font colour box in the Font Group of the Home Tab. A font colour menu appears.
Move your cursor over the various font colours. A live preview of the colour will appear in the document.
Choose the colour of your choice for the text. You have a choice of lot many colours than in the menu. Click on More Colors at the bottom of the menu to access the Colors dialog box. You can choose any colour from there also.
Note: You must have noticed that whenever you select text, a Mini Toolbar appears. You may use that toolbar also to format the selected text. The toolbar appears only if it is set in the Word Options menu.
To use the Bold, Italic and Underline Commands
Select the text Invitation for.
Click the Bold command in the font group. The selected text becomes bold.
Similarly you may use Italics or underline command whenever needed. You may also use keyboard shortcuts once you have selected the text:
Bold: Ctrl+B
Italics: Ctrl+I
Underline: Ctrl+U
To change the Text Case
Select the text 36th Annual Concert.
Click the Change Case command in the Font group on the Home tab.
Select UPPERCASE form the drop down list. The selected text changes to all uppercase.
To Change the Text Case
Select the text 36th Annual Concert.
Select Center Align text from the Paragraph group on the Home Tab. The selected text is centered.
There are four alignment options:
Align Text Left (Ctrl+L): Aligns all the selected text to the left margin.
Center (Ctrl+E): Aligns text an equal distance from the left and right margins.
Align Text Right (Ctrl+R): Aligns all the selected text to the right margin.
Justify (Ctrl+J): Justified text lines up equally to the right and left margins.
To Add the Border
Select the text around which you wish to have a border.
Click on the drop down arrow of Border command in the Paragraph group on the Home tab.
Choose what kind of border you want from the drop down list. We will choose Outside Borders for our purpose.
To Add the Superscript or Subscript
There are instances where we need text below or above the baseline, for example in mathematical formulae (X3) or chemical symbols (H2O). To learn how to achieve this effect, we take the following example:
(a – b)2 = (a + b)2 – 4ab
Type the following text
(a – b)2 = (a + b)2 – 4ab
Select the text 2 after (a– b).
Select Superscript from the font group in Home Tab. (a – b)2 becomes (a – b)2. Similarly change (a + b)2 to (a + b)2.
You can choose Subscript from the Font group in Home tab to give the subscript effect to the select text.
Formatting Paragraphs, Adding Lists and Working with Styles
In Word, when you type content, each time you press Enter key, a new paragraph is created. You can format each paragraph by setting the font, indentation and alignment, specifying the space between two paragraphs or between lines in a paragraph.
Styles are set of formats like font size, colour, alignment, etc that you can apply to a paragraph all together in one go.
To Format Line Spacing
Select the text you want to format.
Click on line spacing command in the Paragraph group on Home tab.
Select any of the spacing options from the drop down list
OR
You may set it in the Paragraph dialog Box that appears when you choose Line Spacing Options… from the drop down menu. Set the appropriate value in the Line spacing drop down box.
To Format Paragraph Spacing
Click on line spacing command in the Paragraph group on Home tab.
Click the Add Space Before Paragraph or Remove Space After Paragraph from the menu.
OR
You may select Line Spacing Options… to open the Paragraph dialog box.
Set the Before and After points in the Paragraph section.
Line spacing is measured in lines or points, which is referred to as leading. When you reduce the leading, you automatically bring the lines of text closer together.
Using Indents and Tabs
Indentation is a good way to draw attention to a specific text. You may use Show/ Hide command in the Paragraph group of the Home tab to see the non printing characters such as spacebar or Tab key markings. This is particularly useful while working with tabs and indents.
Use the Tab key to indent a single line of text. You can also indent multiple lines together by selecting all the lines and then pressing Tab key. Shift+Tab will decrease the indent.
Multiple lines can also be indented using Indent commands in the Paragraph group on the Home tab. You can use these commands multiple times.
Modify Default Indent Setting
Select the text for which you would like to modify the indent setting. Select the Page Layout Tab.
In the Paragraph group, under Indent, set the values for Left and Right Indents.
The Tab Selector
You can set tabs to get several lines of text indented properly. Without any tabs added, each press of the tab key moves the cursor along by one inch. You can specify precisely where you want your text to start after you press the tab key, so that you get the layout you want.
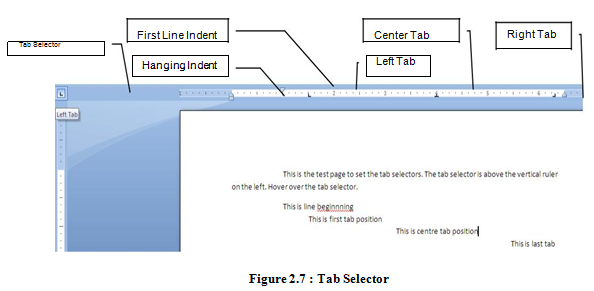 The tab selector is above the vertical ruler on the left. The tab option changes when you click on the tab selector. To set the tab stop:
Click the tab selector till you see the tab stop you want to use.
Click at the point on the horizontal ruler where you want that tab stop.
To remove the tab, just click and drag it off from the ruler.
The tab options are:

Working with Lists
Bulleted and numbered lists can be used in your documents to arrange and format text to draw emphasis. To create a new list:
Select the text you want to format as a list.
Click the Bullets or Numbering command in the Paragraph group on the Home Tab.
Click the bullet or numbering style you want to use. It will appear in the document.
When you position your cursor at the end of the list item and press Enter, an item is added to the list.
You can also change the bullets or numbering style anytime. Select the text in the existing list and use the Bullets or Numbering command in the Paragraph group to select an alternate bullet or numbering style.
You can use Define New Bullet or Define New Number format to change the bullet style and colour or number style and font.
Applying Styles
Styles are powerful tools that can help you create professional looking documents easily. A style is a predefined combination of font style, colour, size of text that can be applied to selected text.
Create a new Style
Click the arrow in the bottom right corner of the Styles group on the Home Tab. This opens the Styles task pane.
There are three buttons at the bottom left corner of the Styles task pane. These buttons are New Style, Style Inspector and Manage Style. Click New Style button. A dialog box appears.
Enter the name of the style and set all the formatting requirements like font style, size, alignment, justification, etc.
If you want the style to be available to all the new documents from now onwards, then select the option New Document based on this template.
Selecting and Applying a Style
Select text to format.
In the Style group on the Home tab, hover over each style to see a live preview in the document. Click More drop down arrow to see additional styles.
Click to select the style. The selected text is formatted in the selected style.
OR
Click Change Styles command on the Ribbon.
Select the style set from the menu that appears. Change is reflected in the entire document.
Format Painter Command
Format Painter is a copying tool that allows you to copy formatting from text to text, or from one graphic or table to another. Format Painter is available in the Clipboard group Home Tab.
Click the formatted text or graphics.
Click on Format Painter button. The cursor will change.
Click the unformatted text or graphics to change the style. The text or graphics will format exactly as the previous section.
Working with Tables and Illustrations
A table is a grid of cells arranged in horizontal rows and vertical columns. Tables can be customized and are useful for various tasks such as presenting text information and numerical data for financial reports, catalogs, etc.
An illustration like Pictures, Shapes, ClipArts, Charts, etc make documents visually more appealing and adds clarity and readability to the document.
Creating a New Table
Place the cursor where you want table to appear Select the Insert Tab
Click Table command
Drag your mouse over the diagram squares to select the number of rows and columns in the table. Click to create the table with selected number of cells.
Modifying the Table.
When you select a table in the document, Design and Layout tabs appear under Table Tools on the Ribbon.
Using commands on the Layout Tab, you can make a variety of modifications to the table such as adding or deleting columns and rows, merge or split cells, change cell size, align cell text, change text direction, etc.

Using the Design Tab, you can choose a Table Style and modify table border or shading.

You can also add your own table styles or modify the existing ones:
Click on the down arrow of table styles for More Styles.
Choose the option New Table Style… OR Modify Table Style… at the bottom of the menu.
Adding/ Deleting Row or Column with right mouse click
Place the cursor in the row below/above which you wish to add the row.
Right click the mouse for a menu to appear.
Select Insert àinsert rows below OR insert rows above OR insert columns to the left OR insert columns to the right option as per your requirement.
You can also use Delete option from the menu to delete the rows or columns.
Convert Existing Text to a Table
Select the text you wish to convert.
Select the Insert tab.
Click the Table command.
Select Convert Text to Table form the menu.
A Dialog box appears. Choose the correct option at Separate text at.
Inserting and Modifying Illustrations
Place your cursor where you want the illustration.
Click the Insert Tab on the Ribbon.
Click on Picture/ ClipArt/ Shapes/ SmartArt/ Chart depending on your requirement from the Illustrations group.
The dialog box will open and you can choose the illustration of your choice.
When you choose a shape, you have to draw it on the document after your selection. Other illustrations are automatically copied once you have chosen them.
You will notice that following contextual Tabs appear depending on the illustration:
Picture/ ClipArt
|
: Format under Picture Tools
| |
Shapes
|
: Format under Drawing Tools
| |
SmartArt
|
:
|
Design and Format under SmartArt Tools
|
Chart
|
:
|
Design, Layout and Format under Chart Tools
|
Using the above options on the Ribbon, you can change the style, size, colour, position, alignment, orientation, etc of the illustration.
You can also do your setting using the Right mouse click on the picture.
When you have text and shapes overlapping one another, you can use Bring to Front and Send to Back Ordering options so that they overlap, but still are visible. The Order option is available when right click on the object.
No comments:
Post a Comment